Customize Email Titles and Subjects
- Understanding Email Customization in SignNow
- Benefits of Customizing Email Titles and Subjects
- Step-by-Step Guide: Customizing Email Titles and Subjects
- Customizing Email Subjects and Messages for Templates
- Personalizing Signer Email Content
- Best Practices for Effective Email Subject Lines
- Preventing Emails from Going to Spam
- Troubleshooting Common Email Customization Issues
Personalizing your email titles and subjects in SignNow is a powerful way to enhance your document signing workflow, improve communication with signers, and ensure your messages stand out in crowded inboxes. Whether you're sending a single document or managing templates for recurring agreements, customizing your email subject lines and messages helps you maintain professionalism, reinforce your brand, and increase the likelihood that your recipients will open and act on your requests. In this guide, you'll discover the benefits of email customization, step-by-step instructions for tailoring your messages, and expert tips to maximize deliverability and engagement.
Understanding Email Customization in SignNow
SignNow empowers users to tailor the subject lines and body content of emails sent to document signers. This customization is available for both individual documents and reusable templates, allowing you to set default messages or personalize each invite. By editing email titles and messages, you can provide clear instructions, reinforce your organization's identity, and create a more engaging experience for your recipients. Customization options are accessible via the web and mobile apps, and advanced branding features are available for organizations seeking a fully branded email experience.
Benefits of Customizing Email Titles and Subjects
- Improved Open Rates: Personalized and relevant subject lines are more likely to catch your recipient's attention and avoid being overlooked or sent to spam.
- Clear Communication: Custom subjects and messages help clarify the purpose of your email, reducing confusion and increasing the likelihood of prompt action.
- Brand Consistency: Tailoring your emails ensures that every communication reflects your organization's tone and style, building trust with your signers.
- Enhanced Professionalism: Customized emails demonstrate attention to detail and respect for your recipients, setting a positive tone for your business relationships.
- Better Deliverability: Well-crafted subject lines and messages are less likely to trigger spam filters, ensuring your invites reach the intended inbox.
Step-by-Step Guide: Customizing Email Titles and Subjects
Customizing your email titles and subjects in SignNow is a straightforward process. Follow these steps to personalize your signer communications and streamline your e-signature workflow.
How to Customize Email Titles and Subjects for Templates
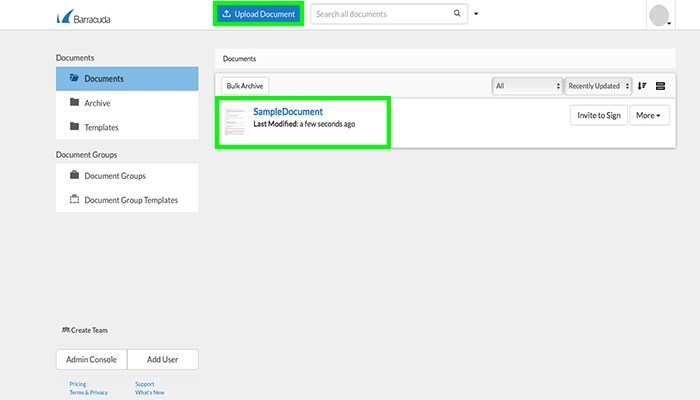
- Upload Your Document Start by adding the document you want to use as a template. Navigate to your SignNow dashboard and click the Upload Document button. Select the file you wish to upload from your computer. Once uploaded, your document will appear in your document list, ready for further action.
- Convert the Document to a Template Prepare your document for repeated use. Click on the More button next to your uploaded document and select Make Template. This action allows you to reuse the document for multiple signing workflows, saving time and ensuring consistency.

- Edit Document Fields Add or adjust fields for your signers. Open the template and use the editing tools to add signature, text, date, or other required fields. Assign fields to specific signers as needed to ensure a smooth signing experience.

- Customize and Save Signer Email Settings Personalize the email subject and message for your signers. After editing your template, click More and select View Signer Email. Here, you can edit the subject line and message that will be sent to each signer. Once satisfied, click Save Signer Email Settings to apply your changes.


Customizing Email Subjects and Messages for Templates
Templates in SignNow allow you to predefine the subject and message for each signing role or step. This is especially useful for documents that are sent out regularly, such as contracts, NDAs, or onboarding forms. By setting up custom email content at the template level, you ensure that every signer receives clear, relevant instructions tailored to their role. To edit these settings, access the template menu, select Edit Signer Emails, and customize the subject and message for each recipient. This not only saves time but also maintains consistency across all your signing workflows.
Get legally-binding signatures now!
Personalizing Signer Email Content
Personalization goes beyond simply inserting a name. In SignNow, you can tailor the subject and message for each recipient, making your communication more engaging and relevant. For example, you might reference the specific document being signed, include a deadline, or provide step-by-step instructions. On mobile, tap the gear icon next to the recipient to access subject and message fields. On the web, use the Customize Message option in the invite window. For templates, configure messages for each signing role in advance. This level of personalization helps your emails stand out and increases the likelihood of timely completion.
Best Practices for Effective Email Subject Lines
- Be Clear and Concise: Use subject lines that accurately reflect the content of your email. Avoid vague or misleading language.
- Keep It Short: Aim for subject lines under 50 characters to ensure they display well on all devices.
- Use Action-Oriented Language: Encourage recipients to take action, such as "Please Sign: [Document Name]" or "Action Required: Signature Needed".
- Personalize When Appropriate: Reference the recipient's name or the specific document to increase relevance.
- Avoid Spam Triggers: Steer clear of excessive punctuation, all caps, or words commonly flagged as spam (e.g., "Free", "Urgent", "Act Now").
- Align with Your Brand: Ensure your subject lines reflect your organization's tone and professionalism.

Preventing Emails from Going to Spam
Deliverability is crucial for successful e-signature workflows. To ensure your customized emails reach the inbox, follow these proven strategies:
- Use clear, relevant subject lines that match the email content.
- Avoid spam trigger words and misleading phrases.
- Personalize your message with relevant details and a professional tone.
- Craft compelling calls-to-action (CTAs) that are direct and actionable.
- Test your emails with spam checker tools before sending.
- Obtain recipient permission and use double opt-in where possible.
- Encourage recipients to whitelist your email address for better deliverability.
- Validate your email lists to avoid sending to invalid addresses.

For more details on these strategies, visit our Security and Compliance resources.
Troubleshooting Common Email Customization Issues
If your customized emails are not appearing as expected or are being marked as spam, consider the following troubleshooting steps:
- Check for formatting errors: Ensure there are no typos, broken links, or unsupported characters in your subject or message.
- Review spam filter triggers: Avoid using language or formatting that could be flagged by spam filters. Refer to our section on spam trigger words for guidance.

- Test with different email addresses: Send test invites to various email providers (e.g., Gmail, Outlook) to see how your message is delivered.
- Verify recipient permissions: Make sure you have explicit consent to email your recipients, especially for bulk sends.
- Contact SignNow Support: If issues persist, reach out to our Support team for personalized assistance.
Frequently Asked Questions
-
Can I customize the email subject and message for each signer individually?
Yes, SignNow allows you to personalize the subject and message for each signer. On the web, use the 'Customize Message' option when sending invites. For templates, you can set unique messages for each signing role or step. On mobile, tap the gear icon next to the recipient to access these fields.
-
How do I set default email subjects and messages for all invites?
You can configure default email subjects and messages in your account settings. These defaults will be used for new invites and template invites unless you specify custom content for individual recipients. To update your defaults, visit your account settings.
-
How can I ensure my emails don't go to spam?
Follow best practices such as using clear, relevant subject lines, avoiding spam trigger words, personalizing your content, and testing your emails with spam checker tools. Encourage recipients to whitelist your email address and always obtain permission before sending emails.
-
Can I brand my emails with my organization's logo and colors?
Yes, SignNow offers advanced email branding options for organizations. You can add your logo, adjust its position, customize button colors, and add a custom footer. These features are available in the Email Customization tab of the Admin Panel. To unlock advanced branding, contact our sales team.
-
Where can I find more information or get help with email customization?
For detailed guides and personalized support, visit the SignNow University page or reach out to our Support team.