Invite Users to a Team
Collaborating with colleagues in signNow is seamless and secure when you use Teams. Whether you’re onboarding new hires, launching a project, or simply centralizing document workflows, inviting users to your team ensures everyone has the right access and tools to work together efficiently. This guide walks you through every step of the process — from understanding team roles to managing invitations and permissions — so you can build a productive, well-organized workspace in signNow.
Understanding Teams and User Roles in signNow
Teams in signNow are designed to streamline collaboration by allowing multiple users to share documents, templates, and workflows. Each team member is assigned a role that determines their level of access and control. The three primary roles are:
- Owner: The creator of the team, with full control over team settings, membership, and deletion.
- Admin: Can invite or remove members, manage roles, enable shared folders, and (if allowed) view members’ documents. Admins cannot view documents owned by other admins or the owner.
- Member: Can share documents and templates, invite new users, and access shared folders, but cannot manage team settings or roles.
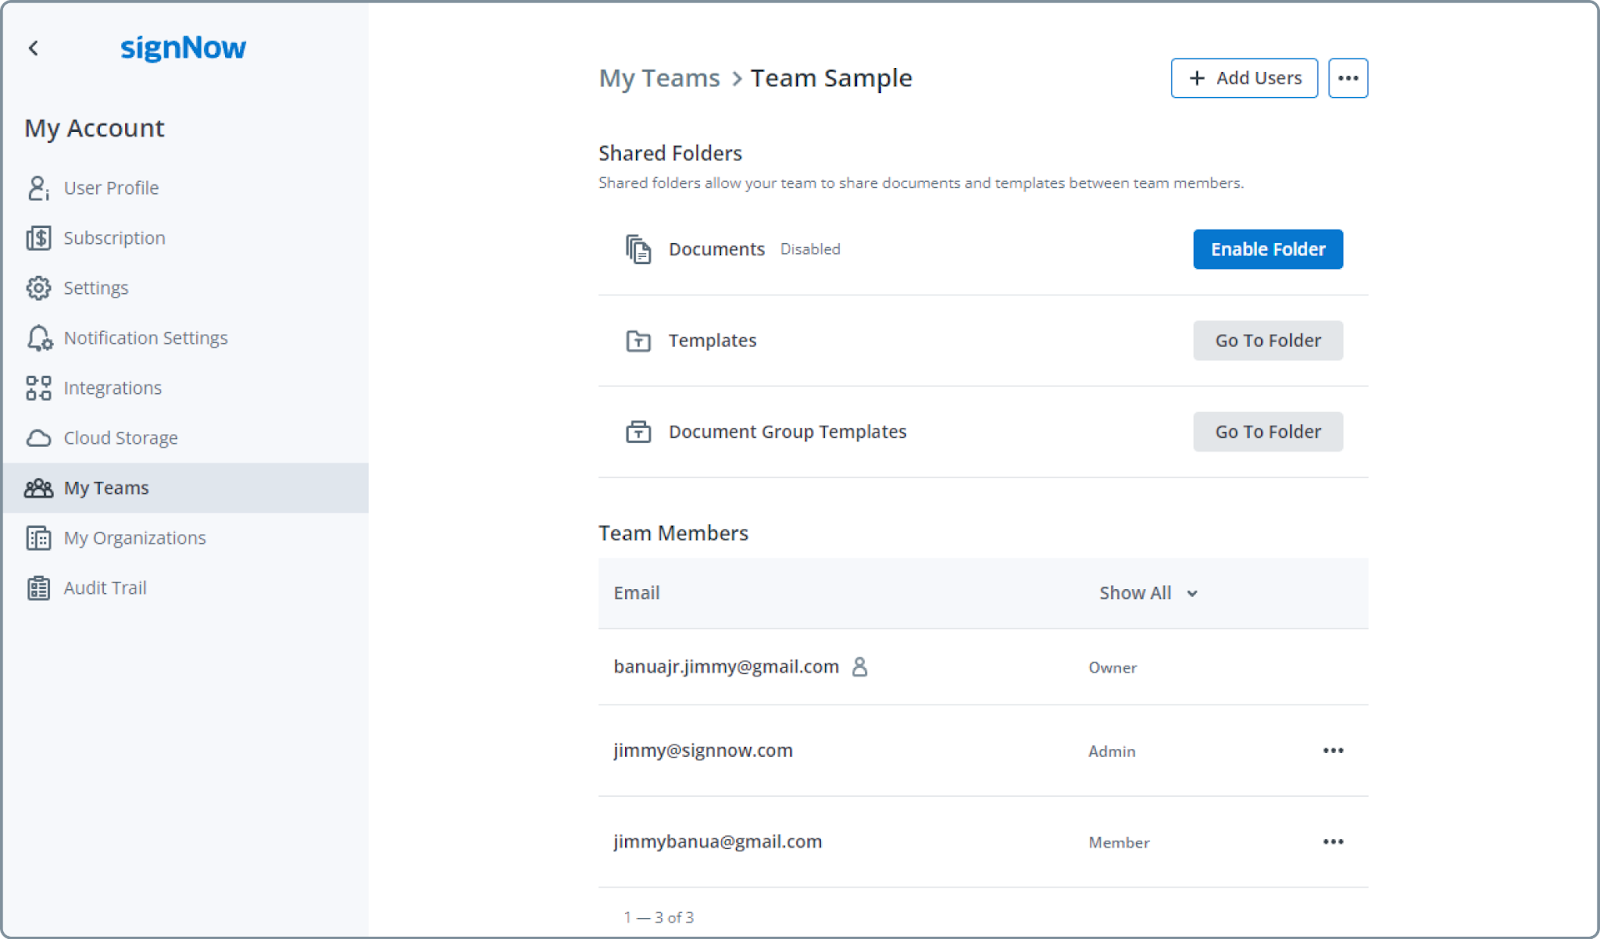
Creating a New Team
To start collaborating, you first need to create a team in signNow. Navigate to the My Teams section from your dashboard. Click the Create Team button, enter a team name, and decide whether admins should be able to view members’ personal documents. This setting can be crucial for compliance and transparency, so consider your organization’s needs before enabling it.

Once your team is created, you’ll see options to manage shared folders and add users. Shared folders for documents and templates are central to team collaboration, allowing everyone to access the resources they need.
Inviting Users to Your Team
Inviting users is simple and flexible. On your team dashboard, click the Add Users button. In the modal that appears, enter the email addresses of the people you want to invite and assign their roles (Member or Admin). You can invite multiple users at once, making onboarding fast and efficient.

After sending invitations, users will receive an email with a link to join your team. If they don’t have a signNow account, they’ll be prompted to sign up. Pending invitations are clearly marked in your team member list, so you can track who has joined and who still needs to accept.
Get legally-binding signatures now!
Assigning Roles: Admins vs. Members
Assigning the right roles is key to maintaining security and productivity. When inviting users, select their role from the dropdown menu. Admins can manage team settings, invite or remove users, and (if enabled) view members’ documents. Members can collaborate on shared documents and templates but cannot change team settings or roles.
You can promote a Member to Admin or demote an Admin to Member at any time from the team dashboard. This flexibility allows you to adapt your team structure as your needs evolve. For a clear view of how roles are displayed and managed, refer to the screenshot below:
Managing Pending Invitations
Keeping track of pending invitations is straightforward in signNow. Invited users who haven’t accepted yet are labeled as Invite Pending in your team member list. If you need to cancel an invitation or resend it, click the three-dot menu next to the invitee’s name and select the appropriate action.

This ensures you have full control over who joins your team and can quickly address any onboarding issues. If a user leaves the team or an invitation is canceled, their access to shared resources is automatically revoked, maintaining your team’s security.
Setting Document Visibility and Permissions
Document visibility is a powerful feature in signNow Teams. When creating your team, you can enable the option for admins to view members’ personal documents. This is especially useful for compliance, auditing, or collaborative review processes. However, privacy is respected — admins cannot view documents owned by other admins or the team owner.
To adjust this setting, check or uncheck the relevant box during team creation. Once enabled, admins can access member documents via the member’s menu. Here’s how the permission setting looks in the interface:

And here’s how an admin can access a member’s documents after the setting is enabled:

Using Shared Team Folders
Shared folders are the backbone of team collaboration in signNow. When you create a team, a Shared Team Templates Folder is automatically generated. Admins and owners can also enable a Shared Team Documents Folder for document sharing. These folders appear on all team members’ dashboards, making it easy to find and work on shared resources.

To enable the Shared Team Documents Folder, simply click the Enable Folder button on your team dashboard:

Once enabled, the folder will be visible to all team members:

Only the owner of a document or template can edit, move, or delete it from the shared folder. If a user leaves the team, their shared items are automatically unshared and returned to their personal folders, ensuring data integrity and privacy.
Managing Team Membership and Ownership
Team management in signNow is designed for flexibility and control. The team owner can rename or remove the team, and transfer ownership to another admin if needed. All team members can invite others, but only admins and owners can manage roles and team settings. To rename or remove a team, click the three-dot menu next to the team name in the My Teams section:

If you need to add users to your subscription (for access to paid features), this is managed separately in the Admin Console under User Management. Subscription and team membership are independent, giving you the flexibility to organize users as needed. For more details on subscription management, visit our pricing page.
Frequently Asked Questions
-
Do invited users need a signNow account to join my team?
Yes, invited users must have a signNow account to join your team. If they don’t already have one, they’ll be prompted to sign up when they receive your invitation email. The sign-up process is quick and does not require payment information for free trials.
-
Can I invite users who are not part of my subscription?
Absolutely. Team membership and subscription users are independent in signNow. You can invite anyone to your team, regardless of whether they are included in your subscription. However, to grant access to paid features, you must add them to your subscription separately via the Admin Console.
-
How do I cancel or resend a pending invitation?
To manage pending invitations, locate the invitee in your team member list. Click the three-dot menu next to their name and select either 'Cancel Invite' or 'Resend Invite.' This gives you full control over the onboarding process and ensures only the right people join your team.
-
What happens to shared documents and templates if a user leaves the team?
If a user leaves the team, any documents or templates they shared in team folders are automatically unshared and returned to their personal root folders. This protects your team’s data and ensures that only active members have access to shared resources.
-
Can team admins view all documents in the team?
Team admins can view members’ documents only if the setting 'Allow admins to view members’ personal documents' is enabled during team creation. Admins cannot view documents owned by other admins or the team owner, maintaining privacy and security for sensitive files.