Cancel Subscription on iOS
- Understanding SignNow Subscriptions on iOS
- How Subscription Billing Works via Apple
- Step-by-Step Guide: Canceling Your SignNow Subscription on iOS
- Troubleshooting: Subscription Not Showing or Issues with Apple ID
- How to Request a Refund for a Canceled iOS Subscription
- What Happens After You Cancel Your Subscription
- Providing Feedback About Your Cancellation
If you’ve decided to cancel your SignNow subscription purchased through your iOS device, you’re in the right place. This guide will walk you through every step of the cancellation process, explain how Apple handles subscription billing, help you troubleshoot common issues, and show you how to request a refund if needed. We’ll also cover what happens after you cancel and how you can share your feedback with us. Our goal is to make this process as smooth and transparent as possible, so you can manage your subscription with confidence.
Understanding SignNow Subscriptions on iOS
When you subscribe to SignNow using your iPhone or iPad, your subscription is managed by Apple through the App Store. This means all billing, renewals, and cancellations are handled directly by Apple, not by SignNow. This setup ensures your payment information remains secure and gives you full control over your subscription from your device. If you ever need to change, renew, or cancel your plan, you’ll do so through your Apple ID account settings. This also means that any refund requests or billing disputes must be processed through Apple’s support system, not SignNow’s billing team.
How Subscription Billing Works via Apple
Apple subscriptions, including SignNow, are set to automatically renew at the end of each billing period—whether monthly or annually. To avoid being charged for the next period, you must cancel your subscription before the renewal date. After cancellation, you’ll retain access to SignNow until the end of your current billing cycle. For more details on how Apple manages subscriptions, you can visit the official Apple support page at https://support.apple.com/en-us/HT202039.
Step-by-Step Guide: Canceling Your SignNow Subscription on iOS
Canceling your SignNow subscription on iOS is straightforward, but it must be done through the App Store. Follow these steps to ensure your subscription is canceled correctly and you avoid unwanted charges.
How to Cancel Your SignNow Subscription on iOS
- Open the App Store and Tap Your Profile Icon Start by accessing your account settings. On your iPhone or iPad, open the App Store app. In the top right corner, tap your profile icon to access your account settings.

- Go to Subscriptions Find your active subscriptions. Scroll down and tap on Subscriptions. This section lists all subscriptions managed through your Apple ID, including SignNow.

- Select Your SignNow Subscription Identify the subscription you want to cancel. Locate your SignNow subscription in the list and tap it. If you don’t see SignNow listed, you may be signed in with the wrong Apple ID. Try signing out and back in with the correct account.

- Tap Cancel Subscription Initiate the cancellation process. Tap the Cancel Subscription button. Follow the on-screen instructions to confirm your cancellation.
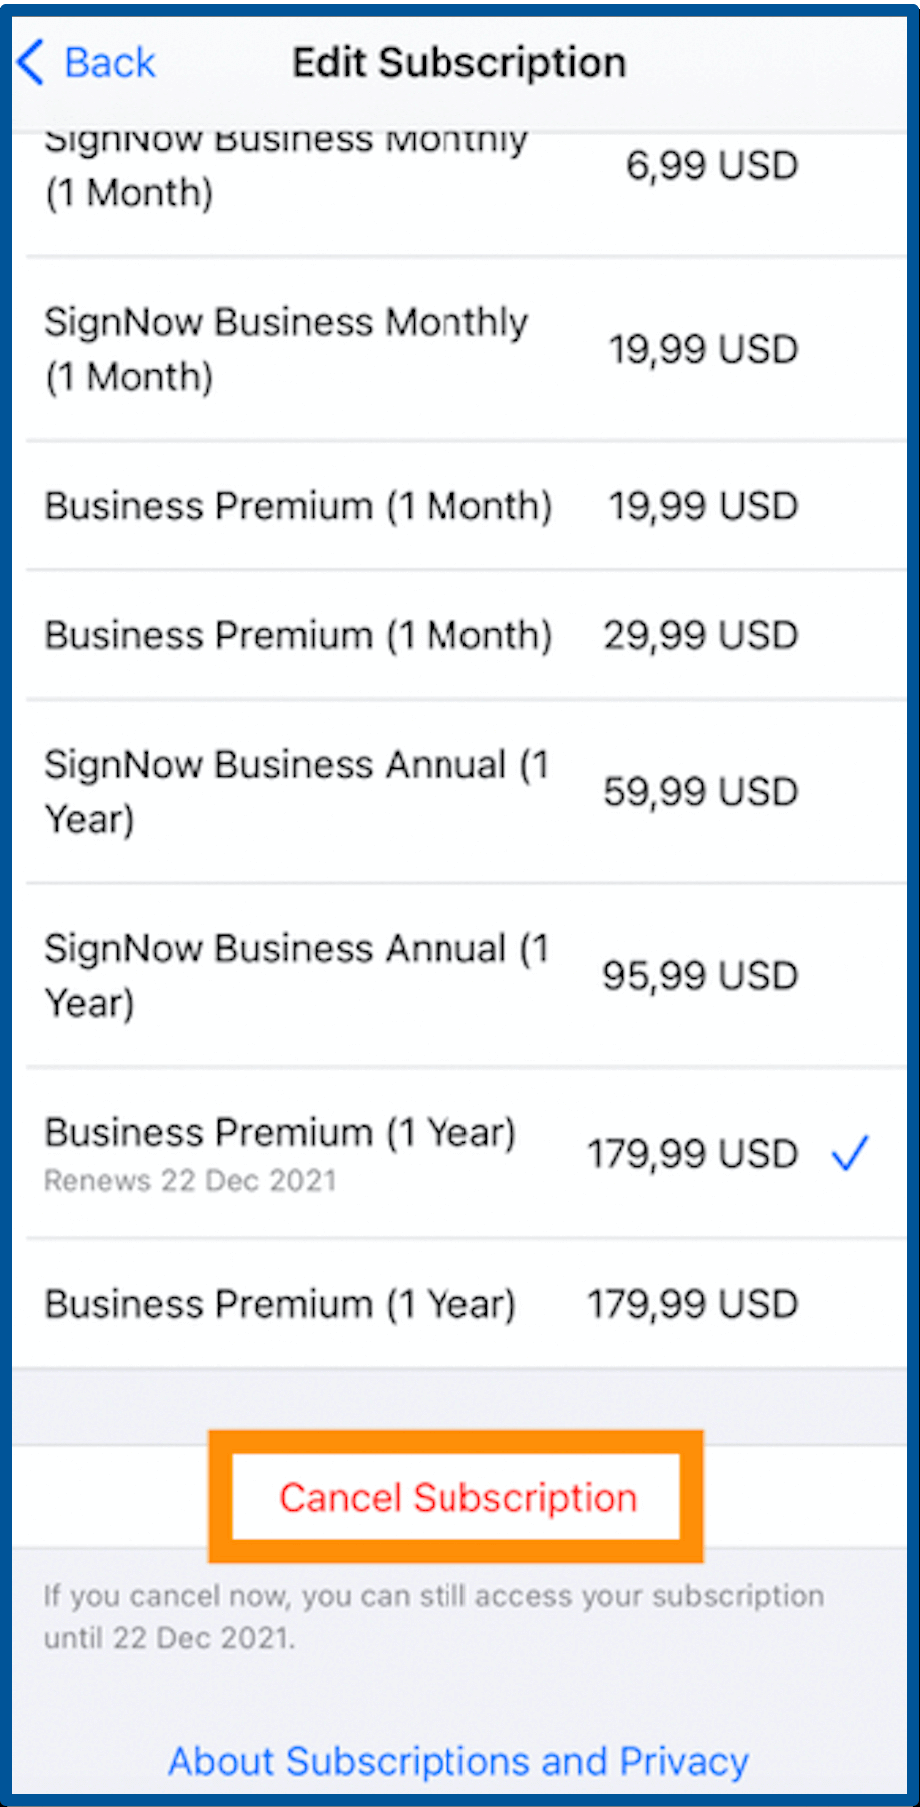
- Confirm Your Cancellation Finalize the process and retain access until the end of your billing period. You’ll be prompted to confirm your cancellation. Once confirmed, your subscription will remain active until the end of the current billing cycle.

Troubleshooting: Subscription Not Showing or Issues with Apple ID
If you can’t find your SignNow subscription in the Subscriptions list, it’s possible you’re signed in with a different Apple ID than the one used to purchase the subscription. Try signing out of your current Apple ID and signing in with any other Apple IDs you may have used. If you still can’t locate your subscription, check your purchase history for confirmation emails from Apple or contact Apple Support for further assistance. This step is crucial to ensure you’re managing the correct subscription and not missing any important billing notifications.
Get legally-binding signatures now!
How to Request a Refund for a Canceled iOS Subscription
If you’ve canceled your SignNow subscription and believe you’re eligible for a refund, Apple provides a dedicated process for submitting refund requests. Please note that all refunds for iOS subscriptions are handled exclusively by Apple, not SignNow. Here’s how to request a refund:
Requesting a Refund for Your iOS Subscription
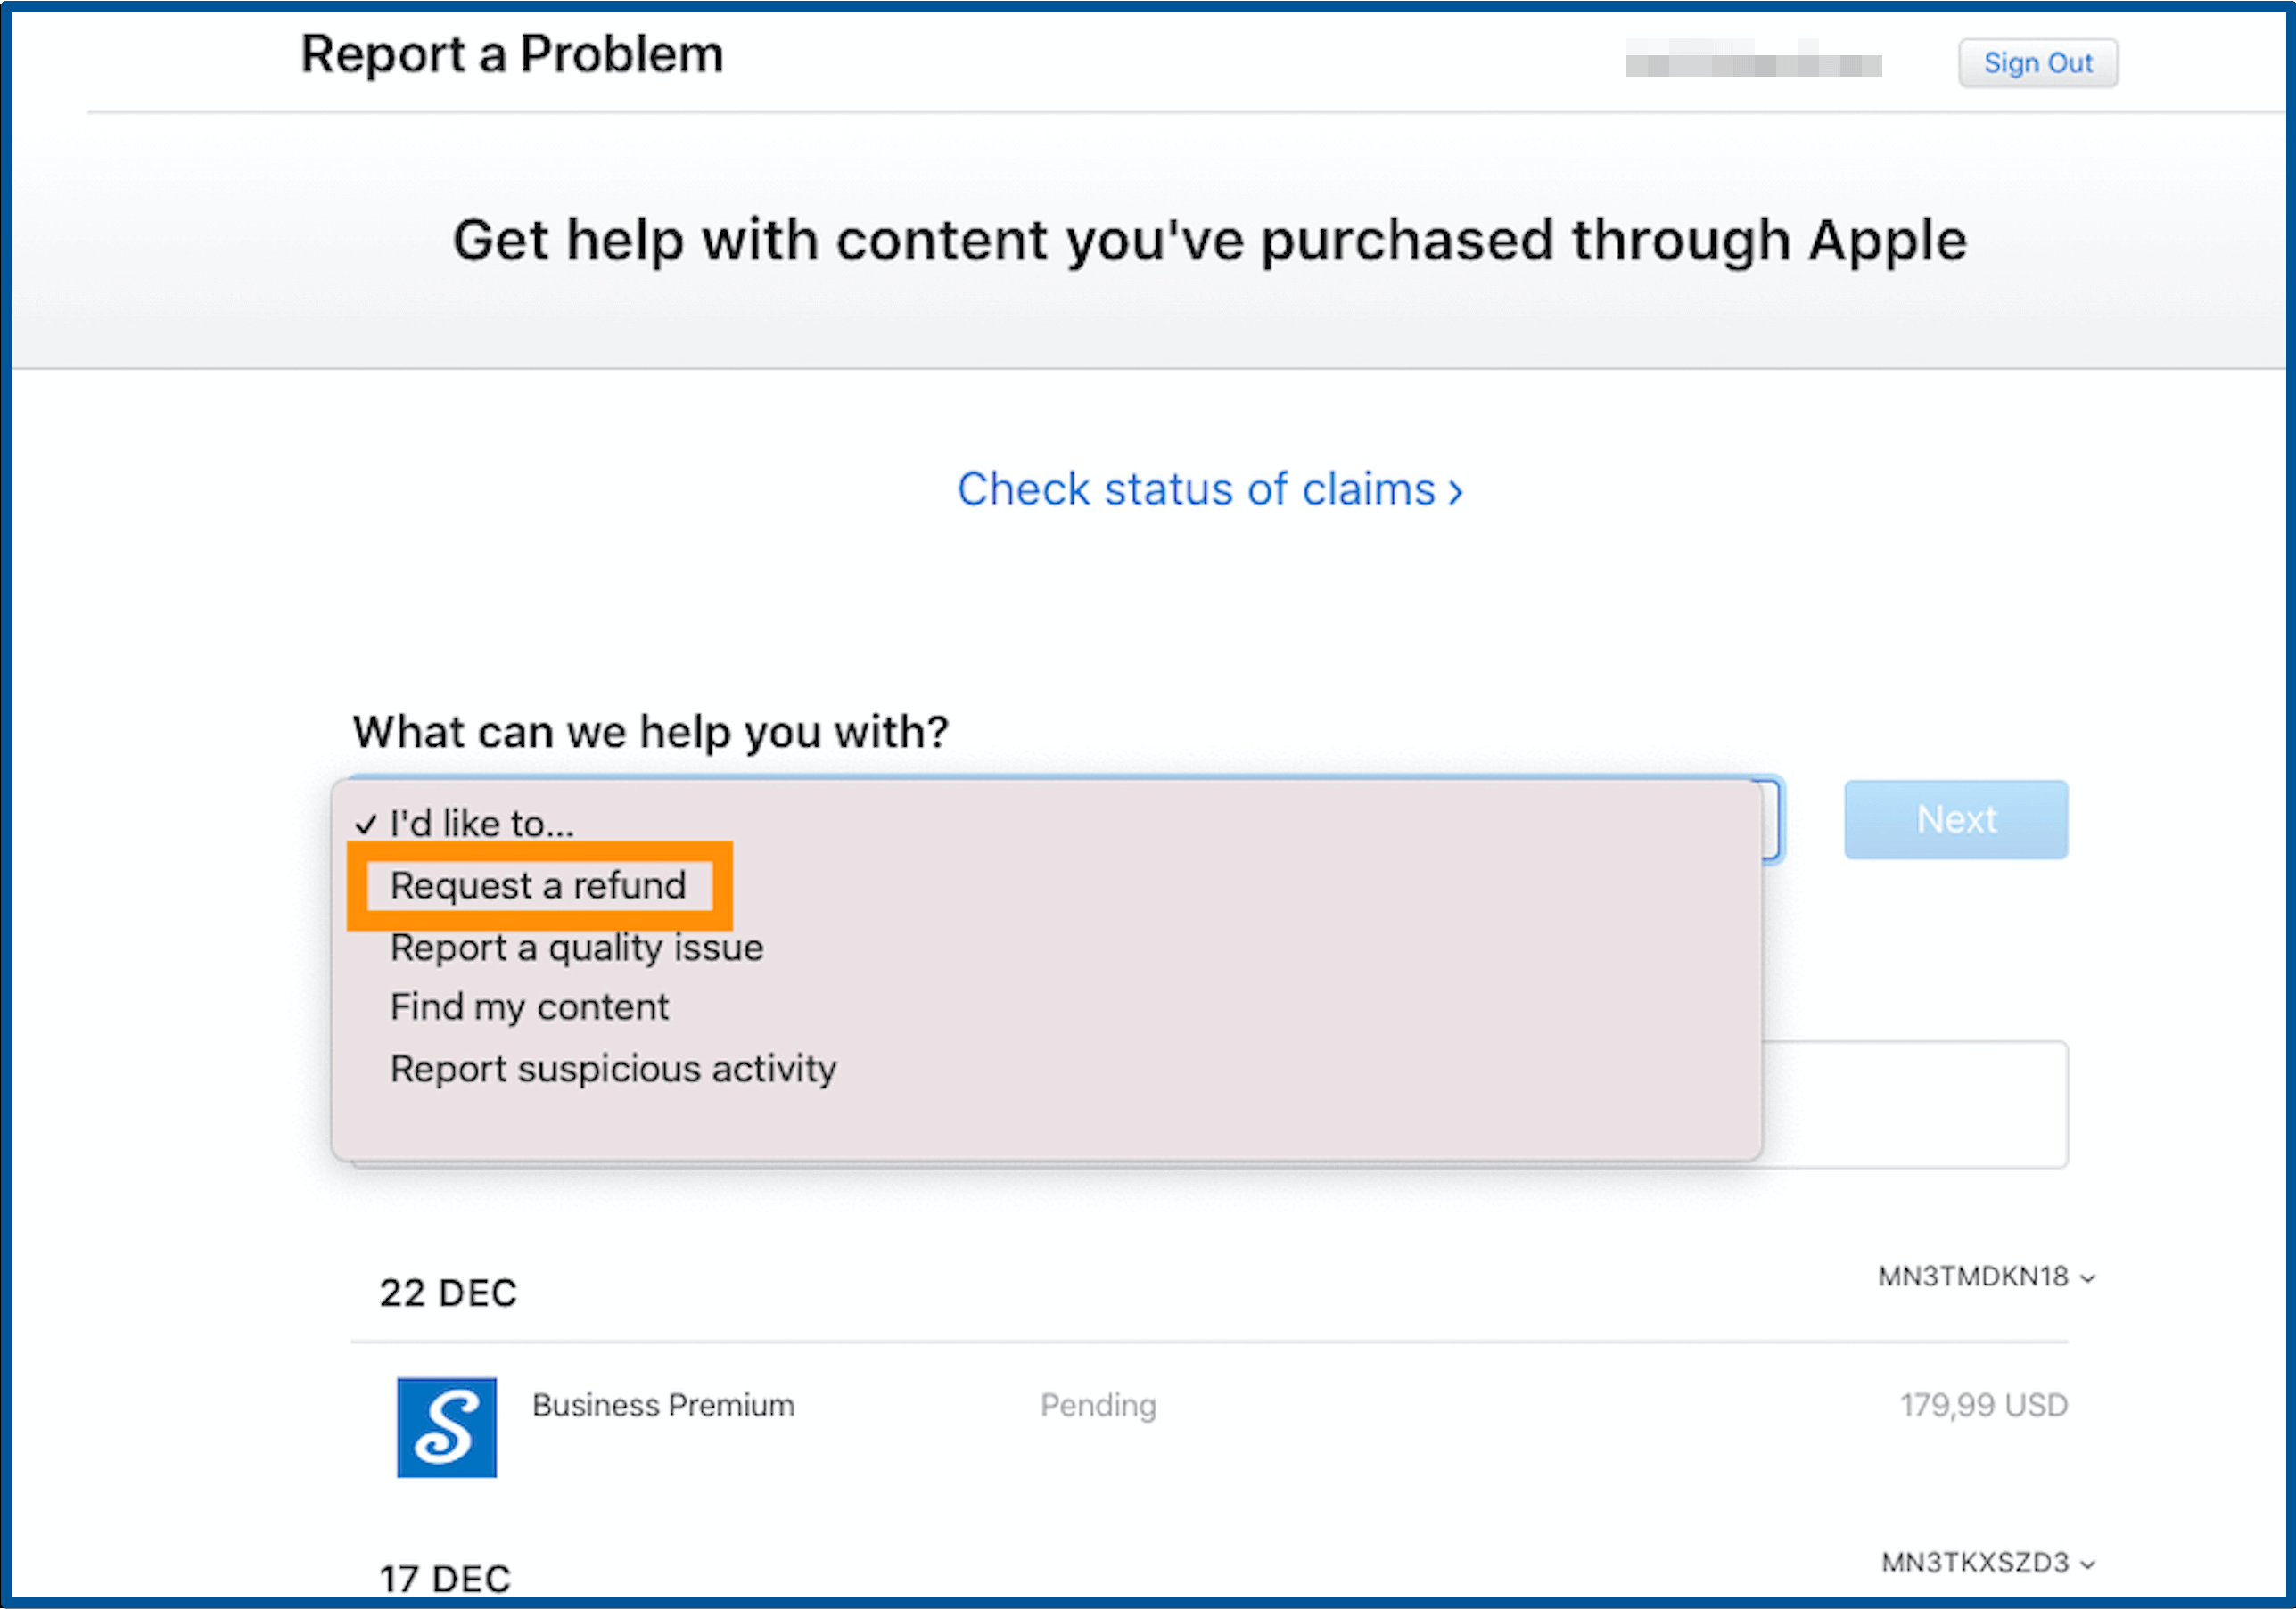
- Visit Apple’s Report a Problem Website Start the refund process online. Go to reportaproblem.apple.com in your web browser.
- Sign In with Your Apple ID Authenticate to access your purchase history. Enter your Apple ID and password to log in.

- Select 'Request Refund' and Choose a Reason Specify why you’re requesting a refund. From the dropdown menu, select Request refund and choose the reason that best fits your situation.

- Select Your Canceled SignNow Subscription Identify the transaction for your refund request. Check the radio button next to your canceled SignNow subscription in the purchase history list.

- Submit Your Refund Request Complete the process and await Apple’s response. Follow the on-screen instructions to submit your request. Apple will review your claim and notify you of their decision via email.
What Happens After You Cancel Your Subscription
After you cancel your SignNow subscription on iOS, you’ll continue to have access to all premium features until the end of your current billing period. Once that period ends, your account will revert to the free version, and you’ll lose access to paid features. You won’t be charged for future billing cycles unless you resubscribe. If you change your mind, you can always renew your subscription through the App Store at any time. For more information about subscription plans and features, visit our pricing page.
Providing Feedback About Your Cancellation
We’re sorry to see you go, but your feedback is invaluable to us. If you’d like to share why you decided to cancel your subscription or suggest improvements, please contact our support team at support@signnow.com or use the live chat feature on our website (look for the chat icon at the bottom right of the page). Your insights help us improve SignNow for everyone.
Frequently Asked Questions
-
Will my SignNow subscription automatically renew if I don’t cancel?
Yes, your SignNow subscription purchased via iOS will automatically renew at the end of each billing period unless you cancel it before the renewal date. To avoid being charged for the next period, make sure to cancel your subscription in advance.
-
Can I cancel my SignNow subscription directly through the SignNow app?
No, if you purchased your subscription via the App Store on your iOS device, you must cancel it through your Apple ID account settings in the App Store. SignNow cannot cancel or modify subscriptions managed by Apple.
-
What if I don’t see my SignNow subscription listed under Subscriptions?
If your SignNow subscription isn’t visible, you may be signed in with a different Apple ID than the one used to purchase the subscription. Try signing out and signing in with other Apple IDs you may have used. If you still can’t find it, check your purchase confirmation emails or contact Apple Support for help.
-
How long will I have access to SignNow after canceling my subscription?
After canceling, you’ll retain access to SignNow’s premium features until the end of your current billing cycle. Once that period ends, your account will revert to the free version, and you’ll lose access to paid features.
-
How do I request a refund for my canceled subscription?
To request a refund, visit reportaproblem.apple.com, sign in with your Apple ID, select 'Request refund,' choose the reason, and select your canceled SignNow subscription. Apple will review your request and notify you of their decision.
-
Can I resubscribe to SignNow after canceling?
Absolutely! You can resubscribe to SignNow at any time through the App Store. Simply follow the same steps you used to subscribe initially.