Send Documents for Signature
Sending documents for signature is at the heart of what makes signNow a powerful e-signature solution. Whether you’re onboarding new employees, closing deals, or collecting approvals, signNow streamlines the process so you can send, track, and manage documents with ease. This guide will walk you through every step — from preparing your document to customizing invitations and managing advanced sending options — ensuring your workflow is efficient, secure, and tailored to your needs.
Preparing Your Document for Sending
Before you send a document for signature, it’s essential to ensure it’s properly prepared. signNow makes it easy to upload files from your computer, mobile device, or cloud storage. Once uploaded, you can open your document in the Editor to add fillable fields and assign signing roles. This preparation step is crucial for a smooth signing experience, as it ensures each recipient knows exactly where and how to provide their information or signature.
To get started, click the Upload or Create button in your signNow dashboard. You’ll be able to browse for files, import from cloud services, or even create a new document from scratch. Once your document is uploaded, select Prepare and Send to open it in the Editor. 
In the Editor, you can assign fillable fields such as Signature, Date and Time, Text, and Initials. Drag and drop these fields onto the document, and assign them to the appropriate recipients. This step ensures that each signer is guided to the correct spots, reducing errors and speeding up completion. 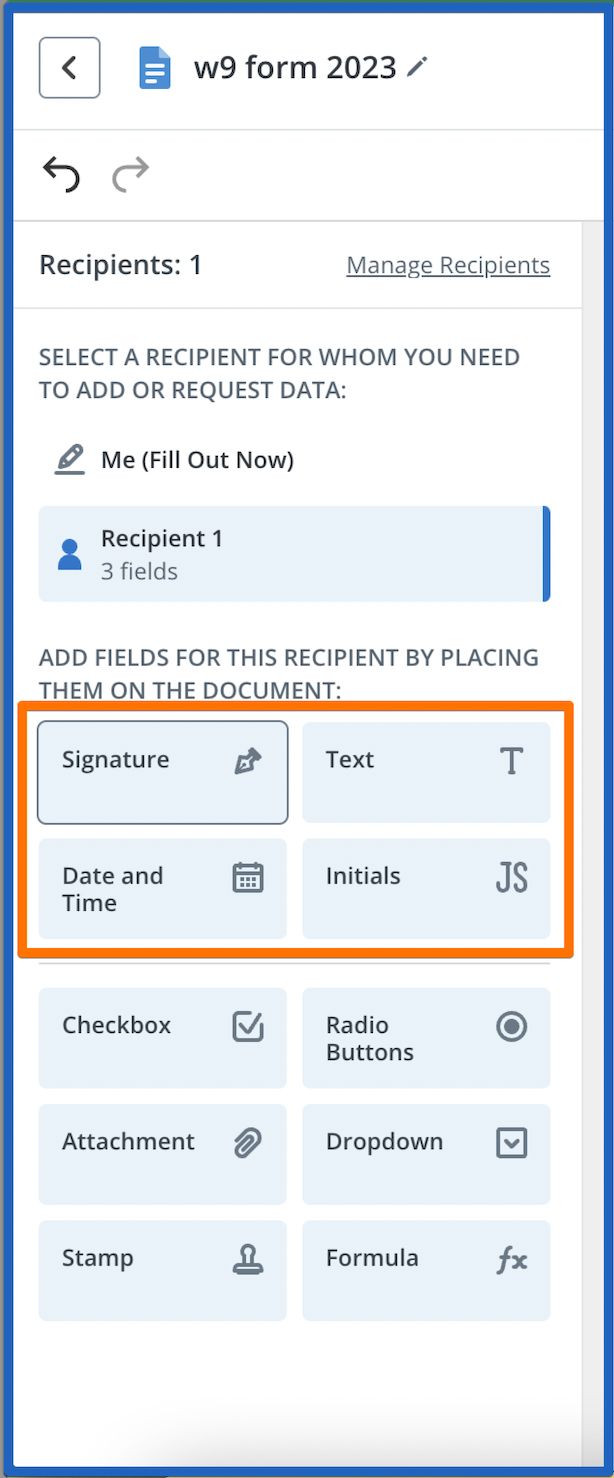
Adding and Assigning Fillable Fields
Adding fillable fields is a vital part of preparing your document for e-signature. With signNow’s intuitive drag-and-drop interface, you can place fields exactly where you need them. Assign each field to a specific recipient, ensuring that only the intended signer can fill or sign that section.
For example, you might add a Signature field for your client, a Date field for yourself, and a Text field for additional information. The left-hand toolbar in the Editor provides quick access to all available field types. 
After placing your fields, you can use the Me (Fill Out Now) option to sign or complete any sections yourself before sending. When you’re satisfied with the setup, click Save and Close or Continue to move on to the sending stage. 
Using the Invite to Sign Button
Once your document is ready, sending it for signature is just a click away. Locate the Invite to Sign button next to your document in the dashboard or within the document editor. This button launches the invitation workflow, allowing you to specify recipients, customize messages, and set advanced options. 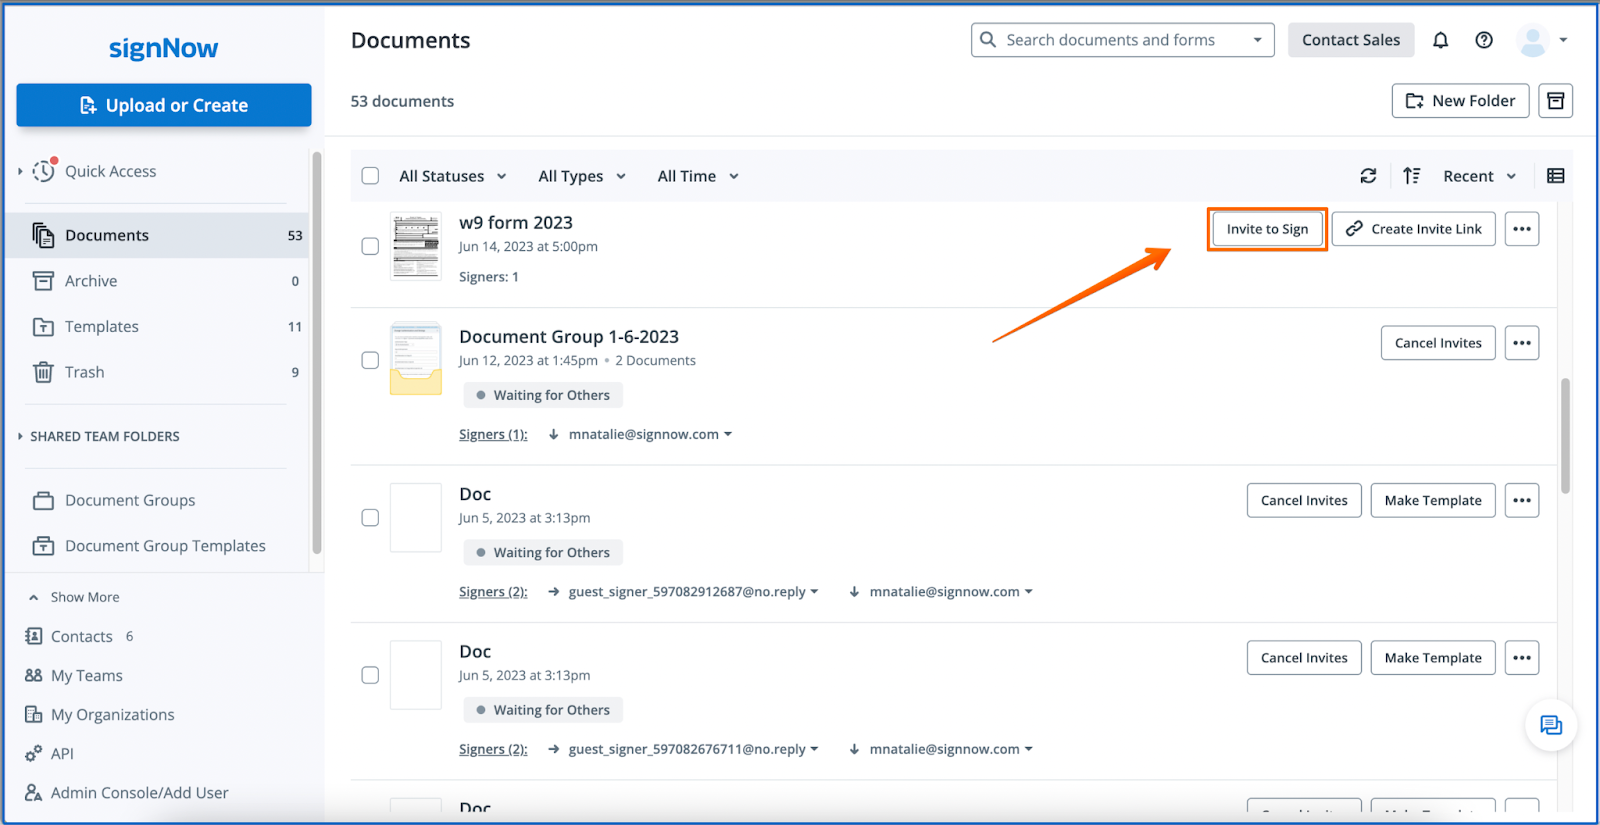
In the invitation window, you’ll see options to enter recipient emails, select sending methods (email or SMS), and add CC recipients. The right panel provides a live preview of your document, so you can double-check everything before sending. This streamlined process ensures you never miss a step and that your recipients receive clear, actionable invitations.
Get legally-binding signatures now!
Customizing Invitation Settings
Personalizing your invitation can make a big difference in how quickly your documents are signed. signNow lets you customize the subject line and message for each recipient, ensuring your communication is clear and professional.
In the Send Invite interface, you can also choose to send invitations via email or SMS, depending on your recipient’s preference. Adding a custom message helps set expectations and provides context, which can increase response rates. 
Managing Recipients and Roles
signNow offers robust recipient management, allowing you to add multiple signers, assign roles, and control the signing order. You can invite recipients by entering their email addresses manually or by selecting them from your contacts.
Assign roles such as Signer or View Only to each recipient. The View Only role is perfect for stakeholders who need to review the document but do not need to sign. You can also add Carbon Copy (CC) recipients who will receive a copy of the completed document. 
For more complex workflows, you can set the signing order — either have all recipients sign at the same time or in a specific sequence. This flexibility ensures your process matches your business requirements.
Advanced Sending Options (Authentication, Expiration, Reminders)
For added security and control, signNow provides advanced sending options accessible via the gear icon next to each recipient. You can require recipients to authenticate their identity using dual-factor authentication, set expiration dates for signing, and schedule automatic reminders to keep your workflow on track. 
These features are especially useful for sensitive or time-critical documents. For example, you can set a document to expire after a certain number of days, or send reminder emails if a recipient hasn’t signed. You can also allow recipients to forward the invite or enable a decline option, giving them flexibility while maintaining control over the process. 
Configuring Actions After Signing Completion
After all recipients have signed, you can automate what happens next using Actions on Completion. This feature lets you set up automatic redirects, send completed documents to specific emails, or even request payments as part of the signing process.
For example, you might redirect signers to a thank-you page, send the signed document to your accounting team, or trigger a payment collection. These options help you close the loop and ensure nothing falls through the cracks. 

Frequently Asked Questions
-
Do I need to add fillable fields before sending a document for signature?
Yes, it’s important to add fillable fields before sending your document. This ensures that each recipient knows exactly where to sign or provide information, making the signing process faster and more accurate. You can add fields using the drag-and-drop editor in signNow.
-
Can I send documents to multiple recipients at once?
Absolutely! signNow allows you to add multiple recipients and assign roles such as signer or viewer. You can also set the signing order — either all at once or sequentially — to match your workflow needs.
-
How do I customize the invitation message for each recipient?
When you use the Invite to Sign workflow, you’ll see options to edit the subject and message for each recipient. Personalizing your message helps clarify the document’s purpose and can increase the likelihood of a quick response.
-
What advanced options are available when sending a document?
Advanced options include setting up recipient authentication, document expiration dates, and automatic reminders. You can also allow recipients to forward the invite or enable a decline option, giving you flexibility and control over the signing process.
-
Can I automate actions after a document is signed?
Yes, signNow’s Actions on Completion feature lets you automate follow-up actions such as sending completed documents to specific emails, redirecting signers to a custom URL, or requesting payments. This helps streamline your workflow and ensures all necessary steps are completed.
Get legally-binding signatures now!
Ready to streamline your document signing process? With signNow, you can send, track, and manage signatures with confidence. For more details on plans and features, visit our pricing page and start transforming your workflow today.